Designed for minor chips and scratches, the multi-pen provides two applicators (a pen tip and a built-in brush) for versatile touch-up work. Ideal for small, precise repairs.
Safety First & Conditions
Work in a well-ventilated area, away from direct sunlight.
Optimal conditions: 60°F–75°F with low humidity.
Wear respiratory protection and gloves.
Keep out of reach of children.
Step 1: Preparation
Wash and completely dry your vehicle using a soap that does not leave wax or film (dish soap works well).
(Recommended) Use a solvent-based wax & grease remover on the repair area.
Inspect the entire surface to locate all chips and scratches needing touch-up.
Step 2: Conditions for Application
Work in a well-ventilated area, out of direct sunlight.
Low humidity is best for optimal results.
Temperature:At least 55°F (13°C).
Wear protective eyewear, gloves, and safety equipment.
Step 3: How to Apply
Shake well before use.
Test the paint on an inconspicuous area to check for color match before applying.
Apply thin coats using light dabbing motions.
Mask off precise areas if necessary for controlled application.
Step 4: Detailed Application Process
Apply Base Coat
Apply several thin coats as needed, using very light pressure.
Allow 10–20 minutes of drying time between each coat until coverage is adequate.
Apply Mid Coat (For Tri-Coat Paints Only)
(Skip this step for non-Tri-Coat paints).
Apply a thin layer of mid coat over the base coat.
Allow 10–20 minutes of drying time between coats.
Apply Clear Coat
Wait 30–45 minutes after the final base/mid coat before applying clear coat.
Apply 2–3 coats of clear coat, with 10–20 minutes of drying time between each coat.
Be gentle with a brush or pen to avoid disturbing previous layers.
Drying Time:
Touch-dry:1–2 hours
Fully cured:24 hours (varies based on temperature, humidity, and coat thickness).
Step 5: Finalizing the Finish
Buff & Shine
Allow 2–3 days for full curing.
Apply a very fine grit rubbing compound or buffing polish for a smooth, glossy finish.
Wait at least 10 days before waxing the repaired area.
Step 6: Cleanup Instructions
Use urethane reducer, lacquer thinner, or acetone to clean tools.
DO NOT use these solvents on the vehicle finish—they will remove all paint.
DO NOT use solvents on skin.
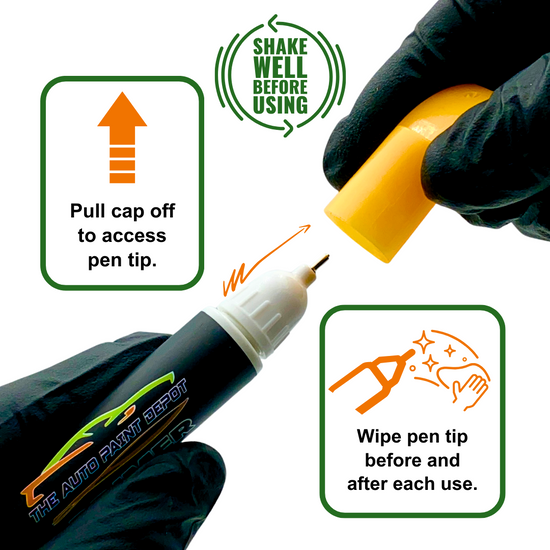
Multi-Pen Operation Instructions
Step 1: Prepare the Pen
Shake Well Before Using
Shake the pen thoroughly for 1–2 minutes to ensure even color consistency.
Access the Pen Tip and Brush
Remove the cap to expose the Multi-pen tip.
Unscrew the cap to access the brush application.
Prepare the Pen for Use
Secure the cap, then unscrew counterclockwise to access the brush.
Wipe any paint from the threads before inserting the brush.
Close tightly, but do not over-tighten.
Step 2: Activate & Apply the Paint
Activate the Paint Flow
Tap the pen tip gently on cardboard or paper to pump paint into the tip.
This ensures a smooth, consistent application.
Access the Pen Tip and Brush
Test on an inconspicuous area before applying to the final project
Avoid over-applying, which can cause drips or an uneven finish.
Scratches can be filled by tapping or drawing along the scratch line.
Step 3: Clean & Maintain
Clean After Use
Wipe the pen tip before and after each use to prevent clogging.